Author Archives: jstkeepbreathing
Brown Rice Pasta with Sweet Potato Puree
One of my favorite things to do when I am cooking
is to try to come up with something based off what I have in the kitchen
without having to head out to the grocery store.
That’s also just an attribution to general laziness,
but I have found that some of my favorite meals have come together
when I was forced to create something with only whatever is available.
So, I can’t be too upset about it.
It also helps, of course, when you train yourself to only stock
the fridge and cupboards with healthy, fresh, options,
such as a variety of vegetables, protein and natural flavorings.
That doesn’t mean, of course, that there aren’t a few things in my kitchen
that aren’t at the top of the healthy list,
but it’s like I said before:
80% of what you need
20% of what you want.
I’ve been a little slack lately on my posting,
but I was honestly way too busy the past couple of weeks to come up with
or discover any new recipes.
But, I did manage to squeeze in this delicious new recipe that I actually
thought of when I was sitting at my desk at work,
wondering what I was going to make for dinner
because I didn’t feel like going shopping.
I remembered that I had a sweet potato sitting on my shelf
and all of a sudden I had the urge to make pasta.
Yes, pasta doesn’t sound like the best thing to think of,
but when you have an amazing, light and low carb,
brown rice penne pasta sitting in your cabinet,
trust me it is.
It was the weirdest thing, but the idea to make a sauce
just popped in to my head and I couldn’t wait to go home to make it.
It was so delicious and the addition of the pistachios was my favorite part,
with the crunchy, saltiness, adding to the sauce,
but you can leave them out, of course, if that’s not your thing.
Hope you enjoy!

Brown Rice Pasta with Sweet Potato Puree
- Skin the sweet potato, poke some fork holes around it and place in the microwave. If your microwave doesn’t have a potato button, heat on high for 5 minutes, or until potato is tender to the touch. Allow potato to cool for a few minutes.
- While the potato is cooking, heat up a skillet on medium low with a TBSP of coconut oil and the sun-dried tomatoes, peppers and garlic puree and saute. Also, set a pan of water to boil for the pasta.
- While the potato cools, put the garlic powder, 2/3 coconut milk, salt/pepper and sriracha in to a large, measuring cup that can fit an immersion blender. If you don’t have an immersion blender, use a regular blender. Cut up the sweet potato in to 4 or 5 pieces and add to the measuring cup.
- Blend the mixture until smooth. If it is too thick, add more coconut milk by the TBSP until it is creamy enough. Test for salt and add more if needed.
- Add pistachios to your pan and allow to brown slightly. Once browned, turn off the heat and add in your creamed sweet potato to heat up and incorporate all the ingredients. Drain your cooked pasta and add the sauce. Top off with some parmesan cheese and enjoy!
Happiness or Satisfaction: Are we kidding ourselves?
I immediately think of someone or something,
a memory, a moment,
anything that is connected to that euphoria
of the complete and utter simplicity of living.
and brought me to realize that most people,
when actually present in that moment of happiness,
recognize that moment and take it as a state of being,
rather than a fleeting emotion:
a temporary cognizance of satisifaction.
but rather in constantly redefining what “happiness” really is.
If we are never sure what it is then how can we find it?
That to be truly happy, a person must be satisfied,
with not just all they have, but with what they expect to have.
because every person desires something more,
even past their point of satisfaction.
The path to that goal is what is always different,
but in a lot of ways, the same.
Money, fame, success, beauty, love, family, acceptance.
are happier than we are, which leads us to be angry and jealous
and also leads us to take on those goals as our own.
with the young, beautiful, wife,
three talented children
and just about everything else one could want,
who ends up sleeping with his secretary,
frauding his company into bankruptcy
and losing his children in a bitter custody battle.
because society defines happiness for us
and we look every day for that definition.
If we do not have it, we conclude we are unhappy.
but satisfaction can bring you happiness.
to survive to see the next.
These people don’t worry about money, beauty, career
the way that we do in the industrialized world,
because it is valued at what they want it to be.
as that feeling is controlled by my own expectations.
hug my family,
kiss my boyfriend,
and text my friends.
the things and people in my life who I need and who need me back.
because it is good to raise your goals and your expectations,
but, rather, it should be a rest stop between those goals and expectations,
so when you are chasing after something,
you need only go back to your last rest stop and find that happiness,
instead of having to start at the beginning.
Spicy Salmon Cakes
I mean, it is freaking amazing.
and plenty of ways to recreate it into something else
so you don’t get bored with the same old thing.
because it takes Salmon to a whole new level
and leaves you wishing you had more of it.
while that can be great and all too,
I’m talking fresh, not frozen, just-off-the-boat,
red and shiny Salmon.
thanks to www.FitDay.com,
and then on with the recipe:
Don’t worry, that’s below too.
Spicy Salmon Cakes

Juice from half a lemon
1 TBSP crushed garlic
Salt/Pepper
1 Medium Red Onion (diced)
3 Green Onions (diced)
Handful of Cilantro (chopped)
2 Egg Whites
Juice from one lemon
½ TBSP Sriracha
1 TSP Oregano
1 TSP Garlic Powder
1 TSP Dried Parsley
½ cup of Plain Bran Flax Cereal (ground in food processor)
2 TBSP Olive Oil
Let sit for a few minutes to soak up any leftover oil.
Read Those Nutrition Labels!
but when I have a sweet tooth, I have it so bad
that I literally will tear apart the room looking for anything
to satisfy it.
bite off more than I should, so to speak.
Ice cream cartons make it difficult to scoop out just a single serving;
Cookies, both handmade and boxed, are way too available
when they are made visible upon entrance into the kitchen;
and candy is just never a suitable sweet tooth satisfaction.

my first reaction was “omg they look delicious, but I really shouldn’t.”
Then I took a moment to read the nutrition label and
immediately put the box in my basket.
has both saved and excited me for a purchase.
to find out if it is doable for your “lifestyle.”
(notice I did not say diet)

Always look at the serving size on a label, first,
because that is what the rest of the label is dependent on.
Some people make the mistake of reading a label
and thinking to themselves, “oh, this isnt that bad,”
but then miss the fact that the serving size is ½ of the actual package.
What does that mean?
That means that the package of Ramen noodles you are able to enjoy,
which, let’s face it, requires the whole package to be an actual meal,
isn’t only 600 mg of sodium.
It’s actually 1200mg because Ramen is sold as a serving for two people,
but only on the nutrition label.
Many products get away with lowering their unhealthy nutrition labels
by reducing the serving size.
take a look and see all the numbers you need to multiply by two.
These cookies have a serving size of 2,
which, in the case of a sweet tooth,
is an amazing thing because when I eat one of these,
I get to cut all of the nutrition numbers in half.
After reading the nutrion values, always read the ingredients.
It is important to understand where all those nutrients are coming from!

They’re your friend in a clean-eating world!
F-It Fridays: Chocolate Peanut Butter Surprise Cookies
Nope, that’s not a typo, just a play–on-words.
The F stands for what you think it does,
but before you think I am some vulgar so-and-so,
I think you’ll completely be in love with the idea
because it basically means I will be putting up those recipes
that destroy the clean-eating aspect,
but leave you oh so satisfied in the craving department.
where you should eat clean, natural, unprocessed foods 80% of the time,
yet allow yourself to indulge and waive-guilt for the remaining 20%.
Whereas diets tend to create a world of fast results,
the standards of that “diet” are impossible to live up to,
causing the dieter to fall back in to their typical ways
and then subsequently back on the road to a new diet.
as opposed to a temporary diet.
A healthy lifestyle doesn’t have to be painful
or unsatisfactory.
That is where the 80-20 rules comes in.
with the weekend accounting for the remainder,
but I try not to over-do it.
Your 80-20 also affects your wallet, which is something to remember.
at least not on a regular basis.
If you have a wedding or special event coming up where you know
it will be hard and/or useless too fight the urge,
allow that to be your 20% for the week.
But, damn it, so worth it!
stay in our apartment this weekend for a bachelorette party,
I immediately offered to bake something yummy for them to indulge in.
I was quick to pick this recipe up.
the actual cooking time,
these cookies were so worth the effort and so easy to make!
so be on the look-out for that in the future!
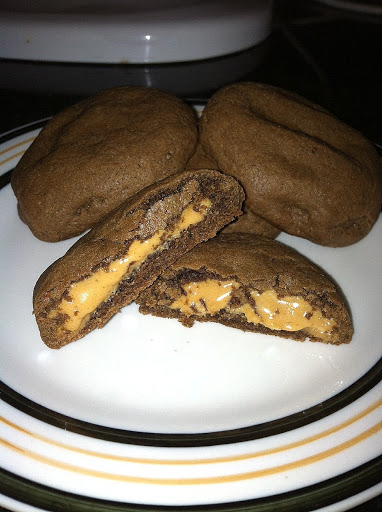
Chocolate Peanut Butter Surprise Cookies
1 1/2 cup flour
1/2 cup Cocoa unsweetened
1/2 teaspoon baking soda
1/2 cup sugar (I used organic)
1/2 cup Brown sugar firmly packed
1 stick unsalted butter softened
1/4 cup peanut butter (at least go for the organic kind)
1 teaspoon vanilla extract
2 large Eggs
1 cup peanut butter
1 cup Confectioners Sugar
2. In a small bowl combine flour, cocoa, and baking soda; blend well.
3. In large bowl, beat sugar, brown sugar, butter, and 1/4 cup peanut butter until light and fluffy. Add vanilla extract and eggs one at a time; beat well.
4. Stir in flour mixture just until blended and set aside.
5. In a small bowl, combine filling ingredients and blend well. Roll into 30 one-inch balls.
6. For each cookie, take about 1 tablespoon cookie dough into your hand, roll it slightly and then palm it into a circle, then place one peanut butter ball in the center, bringing the dough around it, covering completely.
7. Place 2 inches apart on ungreased cookie sheet. Flatten slightly with palm of your hand.
8. Bake for 7 – 9 minutes or until set and slightly cracked. Cool on wire racks.
My First 5K!
winning multiple titles, coach of the year,
securing the most career wins in the state of VA at his time,
and even holds the third place spot, today.
for 17 years, including finding time to coach
my brother’s soccer team at one point.
was just something that was going to happen for my siblings and I.
any sport where I was given the opportunity to show up
boys and even get injured,
but the idea of running without a soccerball at my feet
was just excruciating to me.
I love exercising and aerobics,
most specifically yoga and pilates,
but running is still a sore topic to me.
5K race last weekend in memory of a friend of hers
who had recently passed away,
I was a little nervous and skeptical,
but decided to just go for it and support her.
in the best condition to run a 5k,
for which I not only did not train for,
but was also scared of to begin with.
and had even woken up with stomach nerves that kept me
in the bathroom on my knees (TMI, but it had to be said).
Needless to say, I wasn’t able to eat a breakfast, either.
and just watch in support, but thanks to my friends,
I was convinced to try it out and work with what I had.
Despite having to stop and walk a few times on this very hilly course,
and getting dizzy multiple times,
I can honestly say that I am actually really glad that
they convinced me to go for it.
I pushed myself farther than I have in anything
in a really long time and being able to say
feels amazing.
Which, is a motivation to do another one soon,
I figure, if I can complete something like that
in the condition I showed up in,
then I should be able to do it again,
in better shape and maybe even do well.
looking for a “pick-me-up,”
even if you hate running as much as I do.
P.s. my sister, Vasilia, was unable to race due to back problems
from a recent car accident,
but having her on the sideline cheering me on was the best!
Thanks Silly!

Sesame Lemon Salmon
Sesame Lemon Salmon

- Set oven to 400 degrees
- Place two sheets of tin foil over a pyrex big enough to hold the filet with space on the sides to spare. The sheets should cover each other in a cross shape. Place the fillet skin side down on top of the foil in the middle of the dish.
- Season the fillet evenly with salt and pepper. Spread the crushed garlic evenly on top and then top with the lemon juice. Sprinkle the sesame seed oil over the filet.
- Bring up the sides of the foils to cover the filet in a “tent” fashion. Place in the oven.
- After 20 min, unfold the top of the tent to expose the fillet. Bake for 5-10 more minutes or until the fillet is flaky and light pink with no red.
Ricotta, Lime and Almond Cookies
but it’s super delicious and had to share again.
and full of citrus flavor.
and nothing to do with it
so I decided to bake these gems
so it didnt go to waste.
for Citrus Ricotta Cookies.
not wanting to let things go to waste,
which begs to question,
why the hell am I buying all these groceries
if I am not using them?

Ricotta, Lime and Almond Cookies
Cauliflower Crust Pizza
at the terrifying week we have been having in the United States,
but most specifically Boston.
It is a sad feeling to know that we live in a world
where it can change for the worse at any given second
simply because of the selfish cruetly of another person or people.
and her sister are safe and accounted for,
but my thoughts and well-wishes are for those
who have been hurt by this great tragedy.
From this we will rise as well.
________________
well pretty much at all,
but I remember the first time I tried it raw and fell in love with it!
which was super sad because I couldn’t enjoy a carrot dip snack anymore,
but that was where cauliflower came in!
a nutriously crunchy raw snack
or a yummy, crispy, roasted side dish!
wonderful world of cauliflower-used-for-anything!
She was the first person I know to make this amazing pizza
and I gotta tell you, I thought she was crazy
to even try it!
But, boy am I glad she did!
you forget that it is called pizza!
There is no flour, no oil and you can eat as much as you want
without getting that “I am so stuffed, but I already started
so maybe I should finish,” feeling.
covering all bases of your nutrtion requirements.

Cauliflower Crust Pizza
1/2 cup almond flour (then add more as you need it)
3 eggs (or you could try flax eggs if vegan)
pinches of salt
a few grinds of pepper
1/2 teaspoon onion powder (optional)
1/2 teaspoon garlic powder (optional)
2-3 tablespoons nutritional yeast (optional)
-
Set oven to 450 degrees.
-
Cut up the cauliflower into flourettes and pulse in a food processor until it resembles rice. Don’t overprocess or else it will be too mushy. Place the “rice” in a towel and squeeze out the excess water from the cauliflower.
-
Whisk 3 eggs in a bowl with the salt, pepper, onion and garlic powder (and any additional spices or the yeast). Add in the mozarella, almond flour and cauliflower until fully incorporated. Use those hands! If it is too wet to handle, add in a little almond flour and mozarella until it is able to come together into a ball. (note – this will NOT resemble regular pizza dough – it won’t be as easy or pliable to work with – that’s ok).
-
So, here is the tricky part. I don’t like to use the parchment paper because in my experience it always ends up sticking to my dough. So, I reccomend either greasing a cooking sheet or using a silicon baking mat. Gently mold the dough a circle on the cooking sheet. Try to spread it to be a little less than 1/4 inch thick.
-
Dust the oregano on top of the dough and place in the oven for 20-22 minutes, or until firm, but not crispy.
-
Take the crust out of the oven and add on your sauce and toppings. I used yellow bell peppers, cilantro, marinara sauce and low-fat mozarella. Place back into the oven until the crust is crispy and your cheese is melted.
-
Enjoy!
DIY: Turn A TV Stand into A Bar
I knew that I wanted to find the perfect wet bar
to have in my new home
and impress all my friends.
The only thing I didn’t know was how HARD it would be
to find that perfect wet bar,
let alone how expensive all the best ones were.
even with the amazing rent deal I have,
doesn’t allow for me to budget that much for home decor.
would be to build my own!
you with something memorable and personal.
a picture somebody had posted online
of an old bookcase that they had turned into a bar.
This got my wheels turning and I decided to start scouring
my local thrift stores to see what kind of old furniture I could find.
As soon as I walked into a local Salvation Army store,
I saw it and I knew what it could be.

so I decided the project would best be completed there,
with more room to paint and store everything.
and remove the shelf from the top.
Luckily, the shelf was held by adjustable pegs so it was easily to take out.
I planned on screwing the shelf in eventually.

was the hardest part of the entire process:
replacing it.
and I was able to find some fiberboard that was relatively inexpensive.
Even better, Home Depot was able to cut the boards for me on the spot.
Being a girl, however, I definitely took the wrong measurements,
luckily too long, and Mike’s Dad was nice enough
to cut the rest of it for me at his house.
two smaller sides and a large board in the middle,
I needed to fill the corners.
I found some slender pieces of molding for practically nothing
and nailed them into the corners.
Not to toot my own horn, but it looked amazing!

This part was tricky because I had to estimate how high the PVC pipes
were going to go, which would be holding wine bottles,
by measuring them not just by a double height,
but also by how I could secure them from top to bottom.
and secured them with an all-purpose glue I found at Home Depot
that is used for pretty much anything and holds forever.
and screwed them underneath the shelf,
leaving sufficient space on the sides and between them,
so that the glasses wouldn’t knock the wall or each other.

The gems you see in the picture above are glass-like jagged rocks
I found at Michael’s for only a dollar a bag.
Yup, a dollar.
These were perfect because I wanted to make the PVC pipes look like they were
surrounded by ice cubes.

I bought these from Bed Bath and Beyond on clearance

by screwing them in from the inside.
a mountable bottle opener.
it arrived with my last intial engraved into it!
Total surprise, but a great one.

Aside from completing the gluing of the rocks,
the only other task was to screw in some blocks of wood
to the bottom back of the bar to provide some more stablization.
one that took three people.
But, we got it there and it fit perfectly into the corner spot I had picked out for it.

So, what do you think??
