Monthly Archives: April 2013
Read Those Nutrition Labels!
but when I have a sweet tooth, I have it so bad
that I literally will tear apart the room looking for anything
to satisfy it.
bite off more than I should, so to speak.
Ice cream cartons make it difficult to scoop out just a single serving;
Cookies, both handmade and boxed, are way too available
when they are made visible upon entrance into the kitchen;
and candy is just never a suitable sweet tooth satisfaction.

my first reaction was “omg they look delicious, but I really shouldn’t.”
Then I took a moment to read the nutrition label and
immediately put the box in my basket.
has both saved and excited me for a purchase.
to find out if it is doable for your “lifestyle.”
(notice I did not say diet)

Always look at the serving size on a label, first,
because that is what the rest of the label is dependent on.
Some people make the mistake of reading a label
and thinking to themselves, “oh, this isnt that bad,”
but then miss the fact that the serving size is ½ of the actual package.
What does that mean?
That means that the package of Ramen noodles you are able to enjoy,
which, let’s face it, requires the whole package to be an actual meal,
isn’t only 600 mg of sodium.
It’s actually 1200mg because Ramen is sold as a serving for two people,
but only on the nutrition label.
Many products get away with lowering their unhealthy nutrition labels
by reducing the serving size.
take a look and see all the numbers you need to multiply by two.
These cookies have a serving size of 2,
which, in the case of a sweet tooth,
is an amazing thing because when I eat one of these,
I get to cut all of the nutrition numbers in half.
After reading the nutrion values, always read the ingredients.
It is important to understand where all those nutrients are coming from!

They’re your friend in a clean-eating world!
F-It Fridays: Chocolate Peanut Butter Surprise Cookies
Nope, that’s not a typo, just a play–on-words.
The F stands for what you think it does,
but before you think I am some vulgar so-and-so,
I think you’ll completely be in love with the idea
because it basically means I will be putting up those recipes
that destroy the clean-eating aspect,
but leave you oh so satisfied in the craving department.
where you should eat clean, natural, unprocessed foods 80% of the time,
yet allow yourself to indulge and waive-guilt for the remaining 20%.
Whereas diets tend to create a world of fast results,
the standards of that “diet” are impossible to live up to,
causing the dieter to fall back in to their typical ways
and then subsequently back on the road to a new diet.
as opposed to a temporary diet.
A healthy lifestyle doesn’t have to be painful
or unsatisfactory.
That is where the 80-20 rules comes in.
with the weekend accounting for the remainder,
but I try not to over-do it.
Your 80-20 also affects your wallet, which is something to remember.
at least not on a regular basis.
If you have a wedding or special event coming up where you know
it will be hard and/or useless too fight the urge,
allow that to be your 20% for the week.
But, damn it, so worth it!
stay in our apartment this weekend for a bachelorette party,
I immediately offered to bake something yummy for them to indulge in.
I was quick to pick this recipe up.
the actual cooking time,
these cookies were so worth the effort and so easy to make!
so be on the look-out for that in the future!
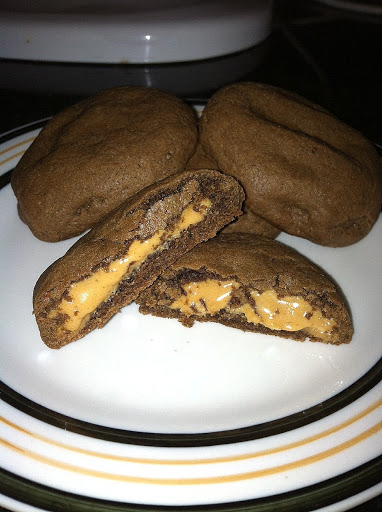
Chocolate Peanut Butter Surprise Cookies
1 1/2 cup flour
1/2 cup Cocoa unsweetened
1/2 teaspoon baking soda
1/2 cup sugar (I used organic)
1/2 cup Brown sugar firmly packed
1 stick unsalted butter softened
1/4 cup peanut butter (at least go for the organic kind)
1 teaspoon vanilla extract
2 large Eggs
1 cup peanut butter
1 cup Confectioners Sugar
2. In a small bowl combine flour, cocoa, and baking soda; blend well.
3. In large bowl, beat sugar, brown sugar, butter, and 1/4 cup peanut butter until light and fluffy. Add vanilla extract and eggs one at a time; beat well.
4. Stir in flour mixture just until blended and set aside.
5. In a small bowl, combine filling ingredients and blend well. Roll into 30 one-inch balls.
6. For each cookie, take about 1 tablespoon cookie dough into your hand, roll it slightly and then palm it into a circle, then place one peanut butter ball in the center, bringing the dough around it, covering completely.
7. Place 2 inches apart on ungreased cookie sheet. Flatten slightly with palm of your hand.
8. Bake for 7 – 9 minutes or until set and slightly cracked. Cool on wire racks.
My First 5K!
winning multiple titles, coach of the year,
securing the most career wins in the state of VA at his time,
and even holds the third place spot, today.
for 17 years, including finding time to coach
my brother’s soccer team at one point.
was just something that was going to happen for my siblings and I.
any sport where I was given the opportunity to show up
boys and even get injured,
but the idea of running without a soccerball at my feet
was just excruciating to me.
I love exercising and aerobics,
most specifically yoga and pilates,
but running is still a sore topic to me.
5K race last weekend in memory of a friend of hers
who had recently passed away,
I was a little nervous and skeptical,
but decided to just go for it and support her.
in the best condition to run a 5k,
for which I not only did not train for,
but was also scared of to begin with.
and had even woken up with stomach nerves that kept me
in the bathroom on my knees (TMI, but it had to be said).
Needless to say, I wasn’t able to eat a breakfast, either.
and just watch in support, but thanks to my friends,
I was convinced to try it out and work with what I had.
Despite having to stop and walk a few times on this very hilly course,
and getting dizzy multiple times,
I can honestly say that I am actually really glad that
they convinced me to go for it.
I pushed myself farther than I have in anything
in a really long time and being able to say
feels amazing.
Which, is a motivation to do another one soon,
I figure, if I can complete something like that
in the condition I showed up in,
then I should be able to do it again,
in better shape and maybe even do well.
looking for a “pick-me-up,”
even if you hate running as much as I do.
P.s. my sister, Vasilia, was unable to race due to back problems
from a recent car accident,
but having her on the sideline cheering me on was the best!
Thanks Silly!

Sesame Lemon Salmon
Sesame Lemon Salmon

- Set oven to 400 degrees
- Place two sheets of tin foil over a pyrex big enough to hold the filet with space on the sides to spare. The sheets should cover each other in a cross shape. Place the fillet skin side down on top of the foil in the middle of the dish.
- Season the fillet evenly with salt and pepper. Spread the crushed garlic evenly on top and then top with the lemon juice. Sprinkle the sesame seed oil over the filet.
- Bring up the sides of the foils to cover the filet in a “tent” fashion. Place in the oven.
- After 20 min, unfold the top of the tent to expose the fillet. Bake for 5-10 more minutes or until the fillet is flaky and light pink with no red.
Ricotta, Lime and Almond Cookies
but it’s super delicious and had to share again.
and full of citrus flavor.
and nothing to do with it
so I decided to bake these gems
so it didnt go to waste.
for Citrus Ricotta Cookies.
not wanting to let things go to waste,
which begs to question,
why the hell am I buying all these groceries
if I am not using them?

Ricotta, Lime and Almond Cookies
Cauliflower Crust Pizza
at the terrifying week we have been having in the United States,
but most specifically Boston.
It is a sad feeling to know that we live in a world
where it can change for the worse at any given second
simply because of the selfish cruetly of another person or people.
and her sister are safe and accounted for,
but my thoughts and well-wishes are for those
who have been hurt by this great tragedy.
From this we will rise as well.
________________
well pretty much at all,
but I remember the first time I tried it raw and fell in love with it!
which was super sad because I couldn’t enjoy a carrot dip snack anymore,
but that was where cauliflower came in!
a nutriously crunchy raw snack
or a yummy, crispy, roasted side dish!
wonderful world of cauliflower-used-for-anything!
She was the first person I know to make this amazing pizza
and I gotta tell you, I thought she was crazy
to even try it!
But, boy am I glad she did!
you forget that it is called pizza!
There is no flour, no oil and you can eat as much as you want
without getting that “I am so stuffed, but I already started
so maybe I should finish,” feeling.
covering all bases of your nutrtion requirements.

Cauliflower Crust Pizza
1/2 cup almond flour (then add more as you need it)
3 eggs (or you could try flax eggs if vegan)
pinches of salt
a few grinds of pepper
1/2 teaspoon onion powder (optional)
1/2 teaspoon garlic powder (optional)
2-3 tablespoons nutritional yeast (optional)
-
Set oven to 450 degrees.
-
Cut up the cauliflower into flourettes and pulse in a food processor until it resembles rice. Don’t overprocess or else it will be too mushy. Place the “rice” in a towel and squeeze out the excess water from the cauliflower.
-
Whisk 3 eggs in a bowl with the salt, pepper, onion and garlic powder (and any additional spices or the yeast). Add in the mozarella, almond flour and cauliflower until fully incorporated. Use those hands! If it is too wet to handle, add in a little almond flour and mozarella until it is able to come together into a ball. (note – this will NOT resemble regular pizza dough – it won’t be as easy or pliable to work with – that’s ok).
-
So, here is the tricky part. I don’t like to use the parchment paper because in my experience it always ends up sticking to my dough. So, I reccomend either greasing a cooking sheet or using a silicon baking mat. Gently mold the dough a circle on the cooking sheet. Try to spread it to be a little less than 1/4 inch thick.
-
Dust the oregano on top of the dough and place in the oven for 20-22 minutes, or until firm, but not crispy.
-
Take the crust out of the oven and add on your sauce and toppings. I used yellow bell peppers, cilantro, marinara sauce and low-fat mozarella. Place back into the oven until the crust is crispy and your cheese is melted.
-
Enjoy!
DIY: Turn A TV Stand into A Bar
I knew that I wanted to find the perfect wet bar
to have in my new home
and impress all my friends.
The only thing I didn’t know was how HARD it would be
to find that perfect wet bar,
let alone how expensive all the best ones were.
even with the amazing rent deal I have,
doesn’t allow for me to budget that much for home decor.
would be to build my own!
you with something memorable and personal.
a picture somebody had posted online
of an old bookcase that they had turned into a bar.
This got my wheels turning and I decided to start scouring
my local thrift stores to see what kind of old furniture I could find.
As soon as I walked into a local Salvation Army store,
I saw it and I knew what it could be.

so I decided the project would best be completed there,
with more room to paint and store everything.
and remove the shelf from the top.
Luckily, the shelf was held by adjustable pegs so it was easily to take out.
I planned on screwing the shelf in eventually.

was the hardest part of the entire process:
replacing it.
and I was able to find some fiberboard that was relatively inexpensive.
Even better, Home Depot was able to cut the boards for me on the spot.
Being a girl, however, I definitely took the wrong measurements,
luckily too long, and Mike’s Dad was nice enough
to cut the rest of it for me at his house.
two smaller sides and a large board in the middle,
I needed to fill the corners.
I found some slender pieces of molding for practically nothing
and nailed them into the corners.
Not to toot my own horn, but it looked amazing!

This part was tricky because I had to estimate how high the PVC pipes
were going to go, which would be holding wine bottles,
by measuring them not just by a double height,
but also by how I could secure them from top to bottom.
and secured them with an all-purpose glue I found at Home Depot
that is used for pretty much anything and holds forever.
and screwed them underneath the shelf,
leaving sufficient space on the sides and between them,
so that the glasses wouldn’t knock the wall or each other.

The gems you see in the picture above are glass-like jagged rocks
I found at Michael’s for only a dollar a bag.
Yup, a dollar.
These were perfect because I wanted to make the PVC pipes look like they were
surrounded by ice cubes.

I bought these from Bed Bath and Beyond on clearance

by screwing them in from the inside.
a mountable bottle opener.
it arrived with my last intial engraved into it!
Total surprise, but a great one.

Aside from completing the gluing of the rocks,
the only other task was to screw in some blocks of wood
to the bottom back of the bar to provide some more stablization.
one that took three people.
But, we got it there and it fit perfectly into the corner spot I had picked out for it.

So, what do you think??
How To Be Beautiful
in life and how, over the years,
it seems to have grown
into a necessity
as vital as water and air.
alter our faces, our bodies, our personas
to match concepts of the contemporary idea of “beauty.”
Concepts that are never really concrete,
because one day’s beauty is another day’s wasted effort.
when we discover that in the battle of natural beauty versus
constructed, superficial chaos,
the latter seems to always win.
isn’t beauty just a matter of what we say it is?
that make all these promises:
even skin tones
fat trimming
pore minimizers
permanent hair removal
covers gray hair
thick, volumized lashes
plump lips
longer, thicker hair
erases dark circles
and does the investment really make a difference to one’s life?
of making myself look as nice as possible.
In the career world, especially one in Marketing, let’s face it:
looks are important.
That’s certainly something that keeps you on edge,
as an employee, but more specifically as a woman,
who already has a hard enough time getting people
to take her seriously.
with no hair construction,
no facial consideration
and no sense of tasteful or thoughtful dress,
in the same fashion,
most would either think he just had a rough night
from working so hard,
or he’s trying something new.
really
but rather that people who are more “attractive” simply issue a higher
level of effort in their maintenance.
in fact, I may disagree with myself on occasion,
especially when I am having one of those days,
you know, where you can’t fix anything.
even if you are born with a “natural” beauty,
you won’t stay that way without the appropriate level of maintenance;
be it a beauty regime,
costly make-up or procedures,
drugstore shampoo versus professional hair care products
or maybe your own stylist…
that would permanently exempt me from somebody dropping the U bomb.
to admit to, but then again, even if I do garner a compliment
here or there, things get awkward.
something happens to my mind on even the simplest:
“You have pretty hair.”
a dance of shadows and sunlight
barking at each other,
fighting for expression:
crap now they probably think that I am shallow
or that I knew that they were going to compliment me
“I got lucky today, it’s usually a mess”
okay, that sounded better
wait, now they’re telling me that my hair always looks nice
what do I say to that?
“no, trust me it takes forever to get it to look nice”
omg why did i say that?
now they are going to think i spend hours on my hair
“not that i spend forever fixing my hair”
okay now they laughed
does that mean they don’t believe me?
ugh, I hate my hair
i wish it was straight and soft
shit, i didn’t compliment their hair
“i love your hair, i wish mine looked like that”
did that sound fake?
I hope they know I really meant that
now they are smiling like they were waiting for me to say that
what if they only complimented me because they knew i would compliment them?
“i was thinking about going lighter, like yours, what do you think?”
that’s better
okay, now they are looking bored
they are probably regretting saying anything to me in the first place
they are probably wondering how i look without my hair fixed now
no they’re not, they don’t care
ugh, how do I get out of this subject
I’m thinking about how I can make sure that my hair always looks
good enough to get the compliment
I don’t feel I deserve
that I want, but can’t handle.
and all of a sudden, there is a discovery of all these brand new products,
all making “new” familiar promises
that I have to try out.
It really makes me wonder who it is I feel the need to
“maintain” myself for, if not for myself.
he thinks I am beautiful,
but even then
I feel that awkwardness, and the need to move on from the compliment
like I don’t deserve it…
so why do I even try?
who breaks necks without intention,
who is constantly complimented,
but remains humble and sweet.
Who doesnt even wear makeup,
aside from the occasional lipstick and eyeshadow.
When somebody asks me how a 40 something year old woman
can literally look like my slightly older sister,
I realize some amazing truths
about my mother and her life.
I am happy enough to have absorbed
her techniques and knowledge
(at least for the most part)
from years of lectures and guidance on her part.
how to be naturally and timelessly beautiful.
A defined beauty that will never change
as demonstrated by my Mom:
wear moisturizer every day
wear sunscreen and cover yourself when out in the sun
don’t cake your face with foundations and cover ups
don’t stretch your skin when putting on eyeliner
always take your makeup off before you go to bed
drink water religiously
don’t get drunk
don’t smoke
eat your fruits and vegetables
get exercise
love with all of your heart
smile a lot
always be honest
never be selfish, but don’t forget about yourself
believe in yourself
don’t be greedy
share
go to bed early
learn as much as you can
listen first
be faithful, loyal and forgiving
but natural beauty can only be maintained from the inside
be just like my beautiful mom

Tara’s Egg Wrap

Tara’s Egg Wrap
-
Drizzle some olive oil in to a medium sized pan on medium-low heat (4 or 5)
-
In a small bowl, beat the eggs with a pinch of salt, pepper, garlic powder and the desired amount of sriracha.
-
Once the pan is heated, add in the bell pepper, squash and hot dog and allow to cook until the squash is tender.
- Add in the beaten eggs and swirl pan to cover the veggies and hot dog. Allow to sit for a minute or two and then gently break up the eggs by scrambling the mixture for another minute.
- Turn off the heat and take the pan off the burner. Add the cheese to the top of the scrambled mixture and cover the pan to let the cheese melt.
-
Once the cheese has melted, pour half of the mixture down the middle of the tortilla (top to bottom), leaving space between the filling and the edge of the wrap at the top and bottom. Garnish with the cilantro.
-
Roll up the wrap by folding the bottom over 1/4 of the filling and then folding in the sides of the tortilla over the bottom fold. Roll the wrap upwards.
Cauliflower Veggie Rice
to buy in bulk,
can be used as a part of practically any meal,
and it tastes awesome.
and is one of the hardest foods to work off.
But, who didn’t already know that?
you are in for a real treat.
and certainly doesn’t seem as easy,
but once you try it,
you may have a hard time choosing the real thing over this.
tastes amazing and leaves you with tons of leftovers
to do what you will.
Ever since discovering it for the first time,
I always have a head of cauliflower ready to go in my fridge.
Like this salmon and cauliflower rice burrito,
with feta and tomatoes
all in a brown-rice tortilla.
 |
| Califlower Rice and Salmon Burrito |
but I’m not sure I want to try that because, let’s be real,
if it ain’t broke don’t fix it.
Not even with brown rice.
C’mon people.
Do sushi right.
side-dish, but you can leave those out if you like
Try making it your own and adding different flavors
and spices to the mix, or just add salt to make “white rice.”
You can also freeze the pre-cooked rice and save it for another day.
but maybe one day I can invest in a cool camera
that will show the true yumminess of these recipes.

Cauliflower Veggie Rice
- Wash the head of cauliflower and divide into florets. Dry completely.
- Place them into a food processor and pulse until they resemble rice. Do not over-process as they can get mushy! You may need to do this more than once, depending on the size of your food processor.
- Drizzle a little olive oil in to a large pan and then caramelize the diced onion on medium heat until it is translucent and then a little brown.
- Add in the sun dried tomatoes and the squash. Saute until the squash is tender.
- Add in the cauliflower, seasoning to taste with salt and pepper and whatever spices you desire.
- Saute until the rice is tender or to the consistency you like. Throw in some grape tomatoes and cilantro to garnish.
